
Introduction
This guide explains how to configure an email account using the IMAP protocol in Microsoft Outlook for Microsoft 365.
Before you begin
Ensure you have the following email account information:
- Email Address
- Email Password
- Incoming (IMAP) server
- Outgoing (SMTP) server
- Hosting server hostname (required only when using SSL connections)
Step 1: Launch Microsoft Outlook
Open Microsoft Outlook for Microsoft 365.
Step 2: Add a New Email Account
- Click File in the top-left corner.
- Ensure Info is selected.
- Click Add Account.
Step 3: Enter Your Email Address
- Enter your Email Address.
- Click Advanced options.
- Tick Let me set up my account manually.
- Click Connect.
Step 4: Select IMAP
Select IMAP as the account type.
Step 5: Enter Your Account Details
Complete the following fields:
- Your Name – Your display name.
- Email Address – Your full email address.
- Account Type – IMAP.
- Incoming Mail Server – Based on the settings below.
- Outgoing Mail Server (SMTP) – Based on the settings below.
- User Name – Your full email address.
- Password – Your email account password.
Step 6: Configure the Server Settings
Use one of the following configurations depending on whether you are connecting with or without SSL.
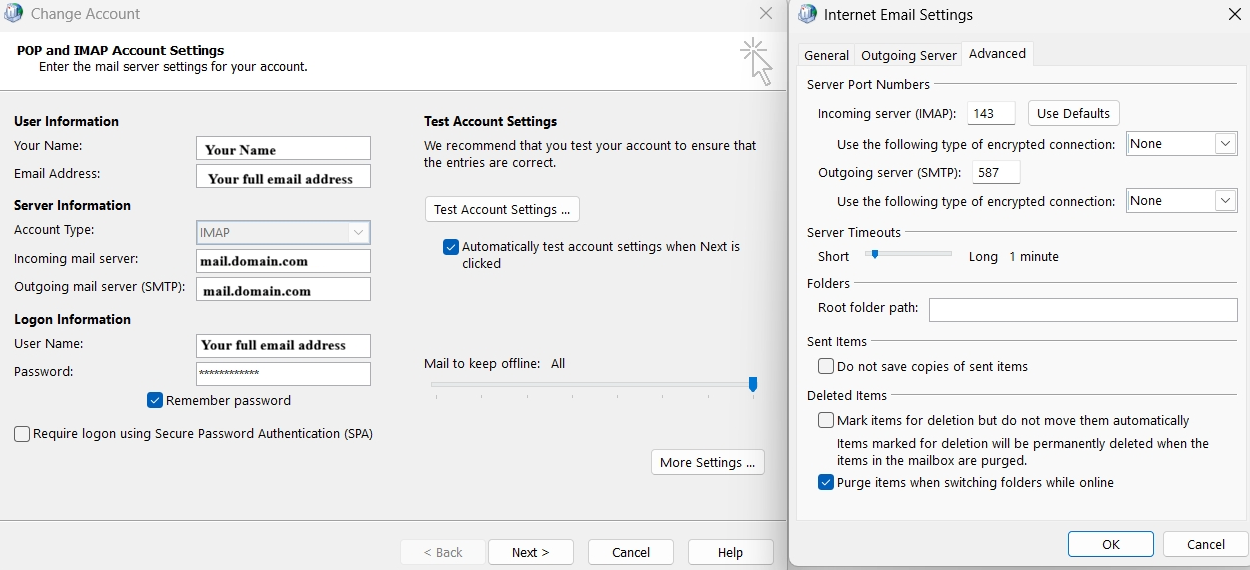
Option A: Non-SSL Configuration
| Setting | Value |
| Incoming Mail Server (IMAP) | mail.domain.com |
| Incoming Port | 143 |
| Encryption | None |
| Outgoing Mail Server (SMTP) | mail.domain.com |
| Outgoing Port | 587 |
| Encryption | None |
Note
Replace domain.com with your own domain name.
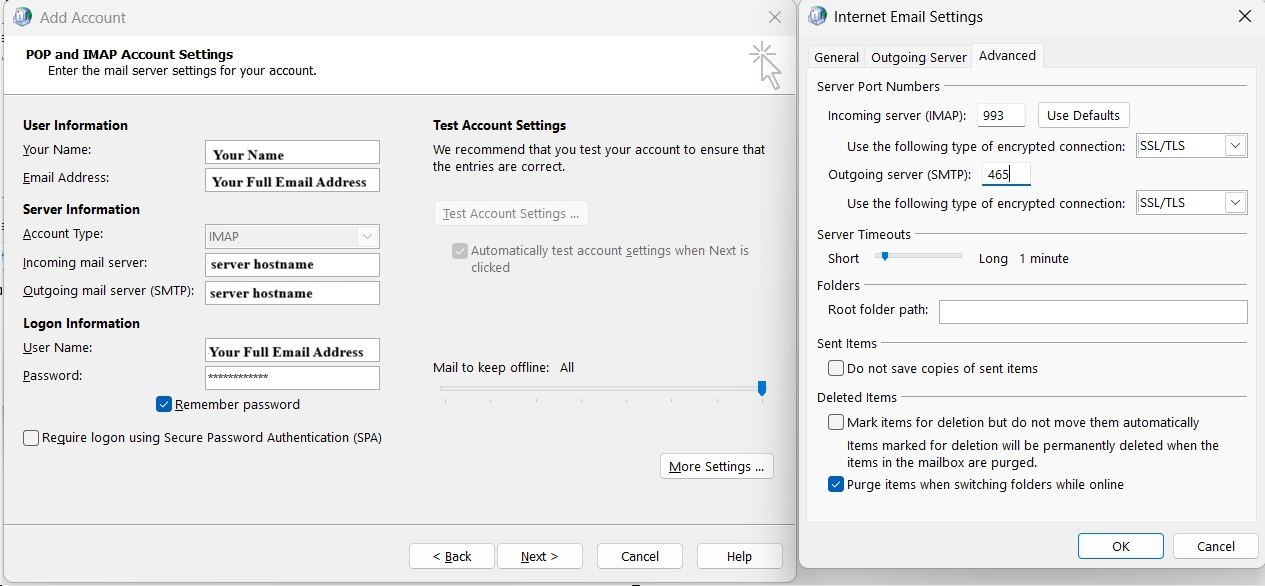
Option B: SSL Configuration
| Setting | Value |
| Incoming Mail Server (IMAP) | serverhostname |
| Incoming Port | 993 |
| Encryption | SSL/TLS |
| Outgoing Mail Server (SMTP) | serverhostname |
| Outgoing Port | 465 |
| Encryption | SSL/TLS |
Note
- Replace serverhostname.com with your actual hosting server hostname (for example server123.hostingprovider.com)
- The server hostname can be found in your hosting control panel under Server Information.
Step 7: Configure SMTP Authentication
Click More Settings, then open the Outgoing Server tab.
Ensure the following options are selected:
- ✔ My outgoing server (SMTP) requires authentication
- ✔ Use same settings as my incoming mail server
Click OK to save the changes.
Step 8: Complete the Account Setup
- Click Next.
- Outlook will verify the incoming and outgoing mail server settings.
- Once the test completes successfully, click Finish or Done.
Your IMAP email account is now configured and ready to use.
Notes
- IMAP keeps your emails synchronized across all your devices. Any changes made in Outlook will also be reflected in your webmail and other email clients.
- If the account cannot be verified, double-check the following:
- Email address and password are correct.
- Incoming and outgoing server names are correct.
- Port numbers and encryption settings match your hosting configuration.
- SMTP authentication is enabled.